
- 0
- 1,219 word
An electric dryer that tumbles but never warms is one of the most frustrating appliance issues because everything looks normal until you pull out a pile of damp laundry. The good news is that “running but no heat” usually traces to a short list of causes you can understand without taking the machine apart. This walkthrough explains how power, airflow, safety devices, and the heating circuit interact, why one fault can masquerade as another, and which checks belong on your side of the outlet versus a professional’s bench. You will also learn a few habits that prevent repeat failures once you are back to reliable drying.
- Verify the 240 Volt Supply Before Chasing Parts
Electric dryers need two hot legs for heat. If one circuit breaker in a paired 240-volt breaker trips, the motor can still run on the remaining leg while the heating element sits cold. Start by firmly resetting the dryer’s double-pole breaker: switch it all the way off, then back on. Inspect the power cord and plug for heat damage, and listen for the drum turning; if it tumbles but no heat returns after a full breaker reset, a deeper fault is likely. If you end up scheduling service with a local shop such as The Lions Appliance Repair, mentioning that the drum runs and the breaker was reset helps the technician identify the right circuit.
Another problem related to the power supply is the terminal block where the cord connects inside the dryer. A loose screw or overheated lug can char that block and open one leg. The symptom looks identical to a partially tripped breaker: steady tumbling, no heat. Because this area carries live power even with the machine “off,” leave terminal block inspection to a professional unless you are trained and the unit is unplugged.
- Clear the Airflow Path From Lint Screen to Exterior Hood
Dryers carry heat away with airflow. A crushed transition duct, a long vent run filled with lint, or a stuck exterior hood raises internal temperatures and starves the element of moving air. The immediate result is slow or no drying; the eventual result can be a blown thermal fuse. Pull the lint screen and vacuum its housing, check that the transition duct is rigid or semirigid metal rather than flimsy foil, and go outside to confirm the vent hood opens fully under airflow. If air barely moves, you found a problem that can stall heat even when the element is good.
Consider two common scenarios. In a basement laundry with a 25-foot vent and several elbows, lint settles in the last few feet and around a bird guard; the dryer overheats repeatedly until the thermal fuse opens. In a stacked unit tucked into a closet, the foil duct is pushed back during installation and collapses like a straw. In both cases, opening airflow often restores normal drying, while ignoring it can lead to repeat fuse failures after each repair.
- Map the Safety Chain: Thermal Fuse and Thermostats
Electric dryers protect themselves with a thermal fuse and a pair of thermostats. The high limit thermostat shuts the element off if temperatures spike at the heater housing. The cycling thermostat regulates average drum temperature during the cycle. If airflow is restricted or the high limit thermostat fails closed, the thermal fuse, which operates only once, opens and permanently cuts power to the element. Replacing a blown fuse without fixing ventilation is a temporary fix that usually fails again.
These parts sit in the heat path, so their behavior reflects what the air is doing. A dryer that heats briefly and then goes cold may have a high-limit thermostat that opens early because lint is blocking the heater shroud. One that never heats and also never advances in an automatic drying cycle can have a blown thermal fuse, leaving both heat and timer functions that depend on temperature disabled. A technician will confirm with continuity checks and temperature readings; for homeowners, the actionable step is to restore airflow and share the exact symptoms.
- Trace the Heating Circuit: Element, Wiring, and Controls
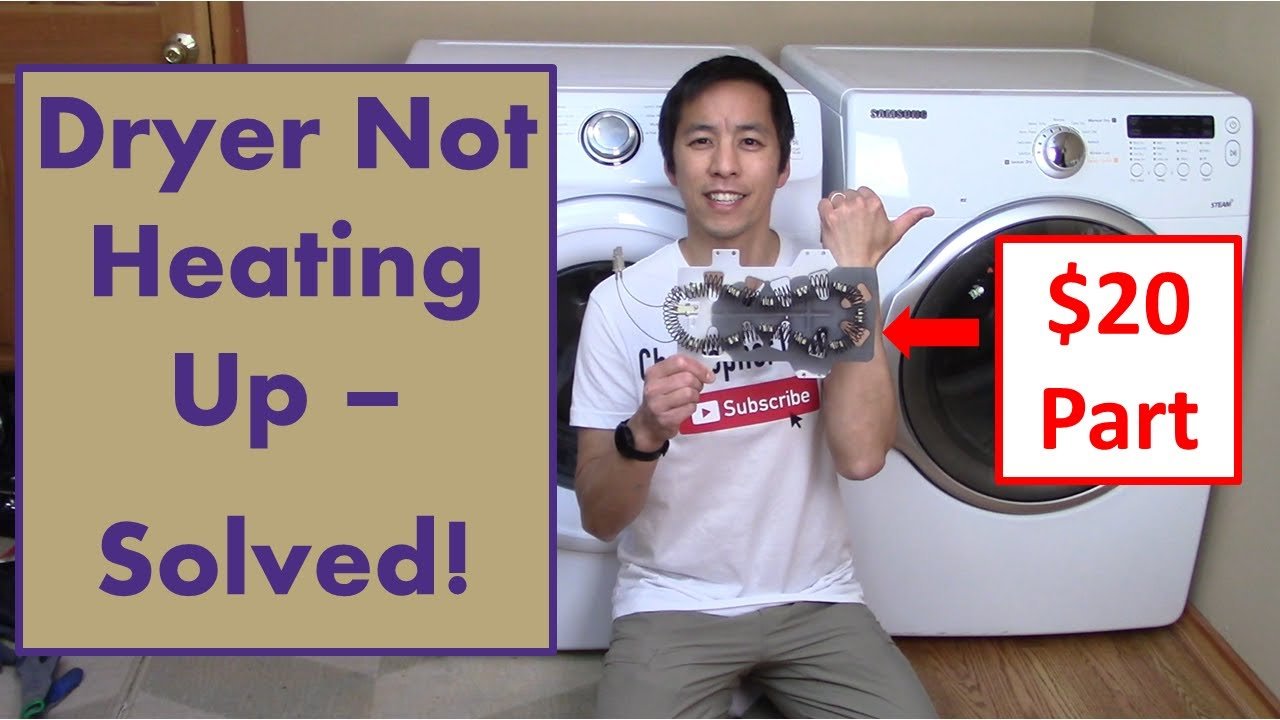
Once power and airflow check out, attention turns to the heating circuit. The heater assembly is a resistance coil that glows red when both legs of power reach it through the thermostats and any relays or timer contacts. An open heating element is straightforward: the coil breaks and the circuit opens, so the dryer tumbles cool on every setting. Elements can open outright or short to the housing, which can also trip a breaker. Wiring issues at the element, a scorched spade connector, or a fatigued crimp can mimic a bad coil with intermittent heat.
On models with a mechanical timer, pitted contacts can starve the element even when the knob points to a heat cycle. On electronic models, a failed relay on the control board can do the same. Door and belt switches rarely cause a lack of heat by themselves, but a slipping belt can reduce drum movement and interfere with accurate moisture sensing during automatic cycles. These are checks of individual components that are better handled with a multimeter and safety training; your role is to note whether heat ever appears on any setting, whether the timer advances on automatic versus timed drying, and whether the breaker ever trips.
Cycle Behavior That Looks Like a Heating Problem
Not every cool load is a heater failure. Automatic drying uses moisture sensor bars in the drum to detect wet clothes. A small load of athletic wear that never touches the bars can end early and feel like the dryer is not heating. A sensor coated with dryer sheet residue can also misread moisture and shut down heat too soon. Timed drying bypasses moisture sensing and will usually run long and hot, but relying on timed cycles to force a dry can overheat a restricted machine and blow the thermal fuse. If automatic drying ends quickly while timed drying warms normally, clean the sensor bars according to the manufacturer’s instructions and run a load of mixed fabrics of normal size to retest. If neither cycle heats, you are back to supply, airflow, or the heating circuit.
There is a trade-off worth calling out. Swapping an inexpensive thermal fuse or heating element might restore heat today, but if the vent path is marginal, the failure often returns within weeks and may take a thermostat with it. Investing in proper venting and a professional cleaning reduces costs over time by keeping temperatures where thermostats were designed to work, which protects the element and preserves cycle accuracy.
What should happen after the fix matters as much as the fix itself. Make a habit of washing the lint screen with water every few months to dissolve fabric softener film, and vacuum the filter housing. Inspect the transition duct each time the dryer is moved, and replace crushed foil with a short, smooth metal connector. Step outside occasionally during a cycle to check for strong airflow and a freely moving hood flap. If your laundry area requires a long vent run with multiple elbows, schedule periodic cleaning to prevent hidden buildup. When you do need service, share the exact symptoms, any breaker trips, and what you observed at the outside hood; that context shortens diagnostics and points the visit in the right direction.
Author

linguaezone.com@gmail.com
Related Posts
How Do Heating and Cooling Repairs Help When a System Loses Performance After Repeated Power Surges?
- 0
- 1,118 word
Repeated power surges can gradually affect heating and cooling equipment even when the system does not stop working immediately. A surge may...
Read out all
Why Is an HVAC Contractor Important When Supply Registers Create Drafts Instead of Even Room Mixing?
- 0
- 1,231 word
Supply registers should distribute conditioned air throughout a room instead of creating an uncomfortable stream aimed at one chair, bed, desk, or...
Read out all
Replacing Exterior Doors in Wayne, Michigan: Material and Installation Choices That Last
- 0
- 1,323 word
Wayne’s winters test every exterior door. Repeated freezing and thawing cycles, snow driven by wind, and road salt can expose weak weatherstripping,...
Read out all
When Your AC Stops Cooling in Watertown: A Repair-Minded Diagnostic Guide
- 0
- 1,094 word
Few things feel as urgent as an air conditioner that quits on a humid afternoon. Before panic sets in, a methodical check...
Read out all
Airflow Comes First: What an HVAC Contractor Checks Before Blaming the Equipment
- 0
- 1,111 word
When a home stops feeling comfortable, the first instinct is to suspect a failing furnace or heat pump. In many cases, the...
Read out all
Drop Dead and Barbas Hats: Alternative Fashion & Streetwear
- 0
- 1,349 word
Streetwear is not defined by a single look. For some people, it means a graphic-heavy outfit with an alternative edge. For others,...
Read out all